Introduction to Keycloak
Keycloak is an open-source identity and access management tool with a focus on modern applications such as single-page applications, mobile applications, and REST APIs.

The project was started in 2014. It has since grown into a well-established open source project with a strong community behind that. It is used for small projects to large enterprises.
Brief Introduction to features and capabilities of Keycloak
Let’s take a brief look at the most prominent features the Keycloak has.
Keycloak provides fully customizable login pages, recovery of passwords, accepting terms, and a lot more. All of these features provided by Keycloak can easily integrate your application without any coding at all. By delegating authentication of the user to Keycloak, you don’t worry about authentication mechanisms, safely store passwords, etc. You can enable two-factor authentication without having to make changes to the application. This also increases your application security because in this situation your application doesn’t have access to user credentials, it can only know tokens issued by Keycloak.
Keycloak also provides single sign-on with strong session management capabilities. It means allowing users to access multiple applications, while only having to authenticate once.
Keycloak builds on industry standart protocols supporting OAuth 2.0, OpenID Connect (OAuth 2.0 + Authentication Layer), and SAML 2.0.
Keycloak uses its own user database. You can also integrate with existing user directories, such as Active Directory and LDAP servers.
Keycloak is a lightweight and easy-to-install solution. You can easily scale via its clustering capabilities. It has its own k8s operator.
Installation with Docker
At the time of writing this article, you can install Keycloak with docker as
docker run -p 8080:8080 -e KEYCLOAK_USER=admin -e KEYCLOAK_PASSWORD=admin quay.io/keycloak/keycloak:15.0.2
This command will start the Keycloak server with the local port 8080 and it also creates an initial admin user with a username and password as admin .
Discovering the Keycloak admin and account consoles
Keycloak Admin Console
It’s for administrators and developers who want to configure and manage Keycloak. In order to access, open http://localhost:8080/auth/admin in a browser and log in with created initial admin user you specified in the docker installation step.
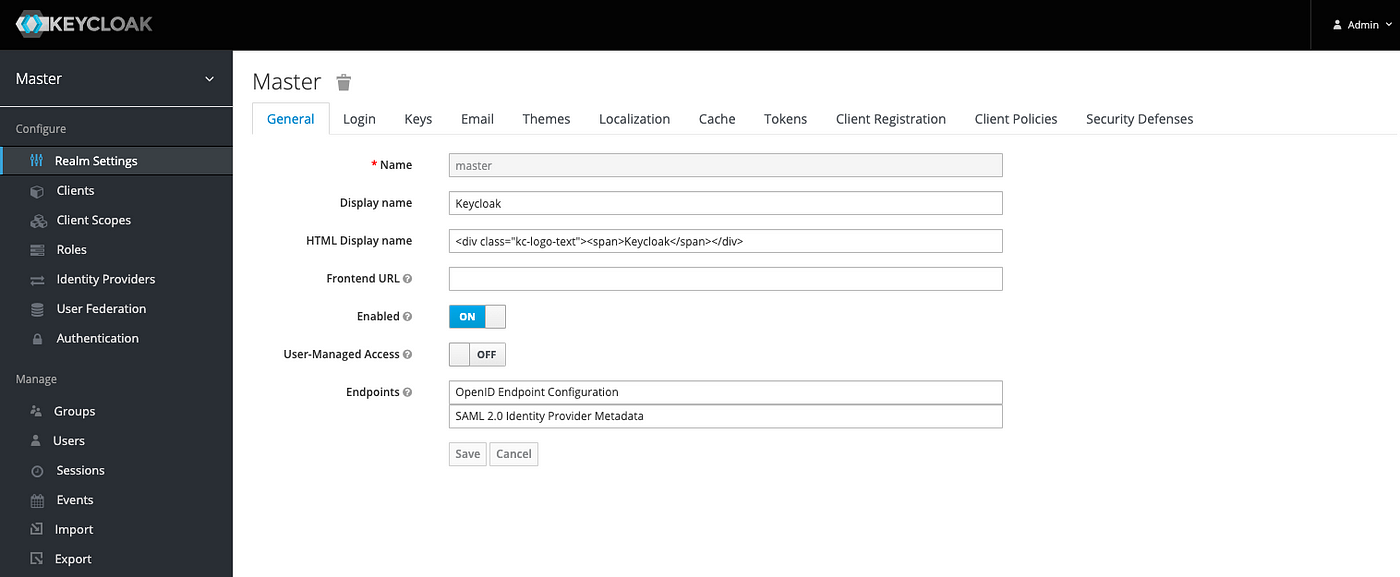
Let’s explain the Configure section.
Realm: You can think of realm as a tenant. So the first thing you will want to do is create a realm for your application and users. A realm is fully isolated (in terms of configuration, users, roles, etc.) from other realms. Because of this, you can create one realm for internal applications and your employees and another realm for external applications and customers.
Client: Clients are entities that can request Keycloak to authenticate a user. Most often, clients are web, mobile and native applications that want to use Keycloak to secure themselves and provide a single sign-on solution. Clients are also can be any type of services such as REST APIs, gRPC, or WebSocket that just want to request identity information or an access token so that they can securely invoke other services on the network that are secured by Keycloak.
Client Scope: allows creating re-usable groups of claims that are added to tokens issued to a client. You can also define an optional client scope. In this way, you should specify the optional claim with the scope parameter.
Roles: usually represent a role a user has in either your organization or in the context of your application. For example, users can be granted an administrator role therefore they can access and perform any action on any resource in your application. Or, they can be granted a human resources manager role therefore they can only access and perform some actions on limited resources. Keycloak also provides the concept of composite roles. But not using this feature carefully, you can increase complexity so your system will become hard to manage and maintain.
Identity Providers: allow users to authenticate to Keycloak using external Identity Providers or Social Networks. Keycloak has built-in support for OpenID Connect and SAML 2.0 as well as a number of social networks such as Google, GitHub, Facebook and Twitter, and more.
User federation: In Keycloak, the term “user federation” refers to the capability of integrating with external identity stores. You can think of LDAP as an example of a candidate for integration via the user federation menu.
Authentication: You can think of authentication as driven by a set of sequential steps or executions that are grouped together in order to verify the user identity. You can customize this followed by copying existing built-in flows or, changing flow priorities maybe removing a couple of them, etc.
Keycloak Account Console
It’s for users. They can manage their accounts by updating their profile, and password, enabling 2FA, etc. Before you access it, you can create a realm and a user within that realm. When you create a new user, that user belongs to the realm you are managing. Users created in a realm can only authenticate through the realm they belong to. If you can create a realm named myrealm, you can access with http://localhost:8080/auth/realms/myrealm/account in a browser. It will redirect to keycloak login page, you can enter the username and password of a user who has registered myrealm.

OpenID Connect (OIDC)
OpenID Connect builds on top of OAuth 2.0 to add an authentication layer. At the heart of OpenID Connect sits the OpenID Connect Core specification which is aim to provide a whole ecosystem to no longer need to deal with user management and authenticating users. Just think about the endless website that allows you to log in via your Google account. You should not only think of social login, you can think of a centralized solution for enterprise support with single sign-on. It also comes as stronger authentication, such as OTP (one-time password) or WebAuthn without the need to support directly in your application code.
The most common way to authenticate a user with Keycloak is through the OpenID Connect authorization code flow.
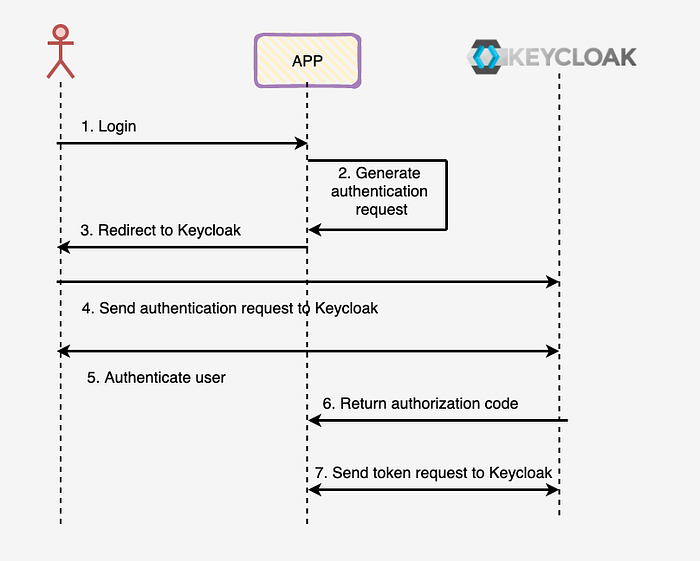
1- The user clicks on a login button in the application.
2- The application generates an authentication request.
3- The authentication request is sent to the user with a 302 redirect.
4- User redirected authorization endpoint and keycloak display login page to the user. The user enters their username and password and submits the form.
5- After keycloak has verified the user’s credential, it creates an authorization code, which is returned to the application.
6. The application exchange the authorization code for the ID Token, as well as the refresh token. The ID token is default a signed JSON Web Token (JWT). So their format as <Header>.<Payload>.<Signature>. The header and payload is Base64URL-encoded JSON documents.
You can customize any of the authentication flows from the dashboard.
That's it. Thank you for reading. I strongly recommend the [2] book to check it out.